Wednesday, July 30, 2008

keeping veggies fresh

So, the garden is full of veggies, as are your fridges.

Just HOW do you keep everything fresh?


Last year one of our customers told us about these bags, and they are great!

We found the above at Fleet Farm, but have also found them at the Good Food store.


The bags vent the ethylene that is released by most fruits and veggies...this prolongs the freshness. A very good thing!


They work with everything from herbs and lettuce to veggies and fruit.

Monday, July 28, 2008

Roasted Eggplant

This is SO quick and easy.

Wash the eggplant.
Trim the top off.
You do *not* need to peel our eggplant. the Japanese eggplant has thinner skin than the globe variety.
Cut eggplant into planks the length of the fruit. Sometimes we just cut the eggplant in half...sometimes thirds. These planks should be about 1/2" thick, or so.
If you are not yet fond of eggplant, then I recommend salting them. This process removes some of the bitterness. These eggplant don't need this step if you are already a fan of eggplant. To salt them, you simply cover the inside of the eggplant with a coarse salt and let sit about a half an hour or longer. Next, you will rinse the salt off quickly (you don't want them to get mushy!) and pat dry.
Brush the eggplant with olive oil. It will absorb the wonderful flavor from the olive oil (try garlic or rosemary infused olive oil, too!).
Lay them on an aluminum foil or parchment lined jelly roll pan. Roast in a 450 degree oven for about 30 to 45 minutes...or until soft and nicely browned and caramelized. You can also do this on the grill.
All done!
You can eat these on a sandwich (with tomato, cheese, lettuce, maybe bacon?, etc). You can top them with a tomato sauce. You can use them in a salad. We like them with our 4 Pepper Sauce. I'd like to make a lasagna out of them. Yummy! I think I will try that this fall.

So, please give roasted eggplant a try....we think you may like it!

Eggplant!


We grow two types of eggplant. Neither are the big globe type you typically see at the grocery store. The mom gardener does not like that type. : ) In fact, she was quite sure that she did *not* like eggplant at all!
However, we do like to experiment and try new things (and mom gardener likes the boy gardeners to like more things than she does)!
We learned that the Japanese eggplant are supposed to be less bitter. So, a few years ago, we planted Japanese eggplant. So ended our quest to like eggplant.
As soon as we had some ripe Japanese eggplant on the bushes....OK, it took us a good week to get past the "dragging our feet" stage (because eggplant is mushy, bitter, and tasteless!).... it didn't take us long to LOVE eggplant! In fact, on our first try, we were sold!
We now grow two types. The deep purple one is, as you can see, very purple. It is also long and thin...it looks more like a purple cucumber with very smooth skin.
The other type, called Fairy Tale, is small, is lighter purple with wonderful white streaks, and is more globe like. These are harvested at around 4" long! yes, only 4".
Both are tender, *wonderful* roasted, and not mushy or bitter! I'll add that recipe shortly....we are busy right now making sweet corn for lunch.

We hope you will give eggplant a try! We are glad that we did!
: )

Simple Chinese

People always ask me how I get the boys to eat so many veggies, and to cook them themselves, too.
First of all, we eat a wide variety of foods so they are exposed to tastes repeatedly, but in a different way. Harvard Beets. Pickled Beets. Roasted Beets. Beets in chocolate cake. : ) The boys like (or can tolerate!) beets. The dad *loves* them, Mom is still struggling.
As far as cooking...I try to make it easy for them. Pesto is a snap to make. Really! See our recipe a few posts back. We use pesto on pasta, on pizza, for dipping, and on other veggies (like potatoes).
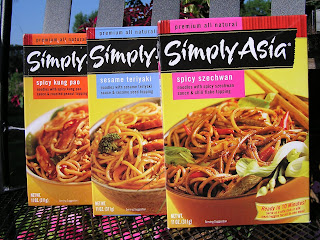
Recently I came across a product that makes eating veggies easy and fun for the boys. The above shown line of Simply Asia box mixes. I know, I don't usually use box mixes. But, keeping the ultimate goal in mind (making it easy and enjoyable for my boys to make and eat veggies), I gave it a try. While this line is not organic, it is "all natural." The ingredient list shows *real* foods and has real spices in it...not "flavored" products. So, I am comfortable using this tool in our kitchen. While the front box is called "Spicy Szechwan," it is not really spicy. We added red pepper flakes to ours.
The box mix itself is straightforward and easy. You make the noodles, you pour on a sauce. : ) The adding of the veggies was quite easy as well, even though I will be quite wordy in sharing our process.
Parker went to the garden and gathered a variety of veggies....a couple carrots, a handful of green beans, an onion, a pepper, a few pea pods, broccoli, some Thai basil leaves, and I had some left over sweet corn in the fridge, and garlic. We love garlic.
We simply washed and chopped to our liking (for example, we like beans long....so we just cut them in half).
We quickly and lightly stir fried them in olive oil in a cast iron skillet. We start with the more firm and longer cooking items like the carrots and onions. When they were just over half done, we added the green beans and broccoli. When those are done, we remove the pan from the heat and dump in the more tender veggies. They get "wilted" from the heat of the pan (a great thing about cast iron) and the other veggies. Done!
Mix the veggies in with the noodles and sauce and your meal is ready.

Thursday, July 24, 2008

Dilled Potato & Cucumber Salad

Dilled Potato Cucumber Salad
1 lb. new potatoes, cut in half or quarters
1/3 cup sour cream
6 cornichons, chopped (about 1/4 cup) cooks note says these are made from gherkins and to substitute gherkins if need be
2 tbs chopped fresh dill
2 tsp. capers, rinsed, drained and chopped
1 seedless cucumber, thinly sliced

Cover potatoes with water, add a good pinch of salt and cook about 10-15 minutes or until done. In the meantime, combine sour cream, cornichons, dill and capers in a bowl. Drain potatoes and return to pot for a minute to dry out slightly. Combine potatoes and cucumbers with sour cream mixture and toss to combine. The recipe didn't say to chill, but I thought cold would be best, so I did.
Though it was good this way, I like to try new things. So, next time, I'm going to make it a little bit differently...I will leave out the gherkins (I never did find cornichons in Rochester!) and add onion. I think tomatoes would be good in here, too.

Tuesday, July 22, 2008

Radish Pods

"WHAT is a radish pod?" you ask. : ) THESE are radish pods! ; )

They are the seed pod of a radish plant and are very yummy. Each type of radish has a different looking pod. We have 3 different types, two are shown here (the ones on top are our favorite!). While they look somewhat like a bean or pea, they have a different mouth feel to them. They are juicy and "pop" when you bite into them. They do have the great radish bite, but not so much as a radish root. We like to eat them raw. There are some recipes for them, which you can find by doing a Google search. We've not tried any of them...yet. : )

Monday, July 21, 2008

Pesto


Pesto


1 1/2 T walnuts
1 1/2 T pignolis (pine nuts), toasted
5 diced garlic cloves
2 1/2 cups fresh basil leaves, packed
1/2 teaspoon kosher salt
1/2 teaspoon freshly ground pepper
3/4 cups good olive oil
1/2 cup freshly grated Parmesan

*Place the walnuts, pignolis, and garlic in the bowl of a food processor fitted with a steel blade. Process for 30 seconds. Add the basil leaves, salt, and pepper. With the processor running, slowly pour the olive oil into the bowl through the feed tube and process until the pesto is finely pureed. Add the Parmesan and puree for a minute. Serve, or store the pesto in the refrigerator or freezer with a thin film of olive oil on top.
Makes 2 cups
***While looking for pesto recipes, I found this tip. I have *not* tried it, but many on the board had and said it works.
To keep this summer goodness for winter use, spoon your pesto into a freezer container, leaving some head room. Cover top of pesto with olive oil, cover container and freeze. Defrost in fridge to use. After each use, make sure the top of the pesto is covered with olive oil, or it will turn black (like an avocado). It will keep in the fridge about a week.

Saturday, July 19, 2008

Grilled Veggies

We grill out as much as possible...year around.
In the summer, we eat this a few times a week.

Grilled Veggies

1 potato per person
2 carrots "
1/2 pepper "
1/2 onion "
(you can add other things like pea pods, green beans, summer squash, beets)

*Cube potatoes and carrots into 3/4" pieces. cook in microwave until just soft (do not cook all the way or they will get too mushy on the grill).
*Slice peppers and onions as you like. we cut the onions into 1/8ths, and the peppers into similar sized slices. you will not need to precook these veggies (or pea pods and summer squash. beans need just a bit of precooking, beets need more, like the potatoes)
*Pour a few tablespoons of olive oil in a large bowl. add all the veggies.
*Season as you like. Following is what we use. (this is for 5 or more servings...we do have three growing gardeners to feed!) adjust seasoning to your tastes.

2 tsp Penzeys Spicy 4S seasoned sea salt
1 tsp McCormick's Worcestershire Ground Black Pepper Blend
1 tsp garlic salt (or garlic powder)
1 tsp onion powder
1 tsp sweet Hungarian paprika
1/2 tsp crushed Red Pepper seeds (the type you find at pizza restaurants...we use hot ones, though. if you don't appreciate spicy food...leave this out)
1 tsp ground turmeric
a few dashes of cayenne powder (again, leave out if you don't like the heat)

Another yummy seasoning is simply chopped up fresh rosemary leaves and a little sea salt.

*Put all seasoned veggies in a grill pan and cook on grill, stirring often, until veggies start to caramelize. this takes at least 30 minutes of grill time.

Enjoy your grilled farm fresh veggies!

Wednesday, July 16, 2008

Green Beans w/Garlic Recipe

The green beans are starting to ripen at a fast and furious pace...and they are SO yummy! Here is what we had for lunch today. The first photo is in the pan, the second shows the beans plated up.

It is very easy to make. (all veggies are from the garden!)

*peel and smash 2 cloves of garlic per person (more or less as you like), set aside so the flavor of the garlic can develop.
*wash and trim your green beans, a handful per person.
*slice an onion.
*lightly saute onion in olive oil.
*with the heat on low, add garlic and beans. (sometimes I add a dash of pepper flakes) cover very loosely for a couple minutes (I just set a lid from a smaller pan on top). this will steam the beans a bit. remove lid.
*gently saute until beans are tender crisp (it doesn't take long when the beans are so fresh and tender, like these are).
*serve and enjoy immediately.
*today the beans were served with grilled chipotle chicken on top. yummy!!!

Saturday, July 12, 2008

Growing Update

The baby green beans are here! Aren't they beautiful?Right along next to them are the summer squash. beautiful and yummy!
With all the rain and sun, the garden is in full production. We were on vacation at the Wisconsin Dells for 4 days and when we came back, we were amazed. The garden had grown a lot!
While we were gone, there were storms at our house. The wind knocked over the peas. They were not broken off though, so there should still be enough for everyone.
This next week we will be at a basketball camp, so our mom will make the deliveries. ~the RoseBros

Saturday, July 5, 2008

Mixed Veggie Pasta


Here is one of our favorite summer recipes. It is yummy and changes as the garden does.

Mixed Veggie Pasta

-your favorite pasta (we like farfalle)
-a variety of your favorite garden veggies. : ) yes, it's a very scientific recipe.
-meat as you like
tonight we used:
onions, chopped
carrots, finely chopped
beets, chopped
pea pods, cut into thirds,
swiss chard, cut into strips

(soon we will be adding beans, summer squash, tomatoes, a variety of peppers, etc)

saute onions in olive oil. Start adding other veggies from the most firm (carrots) to the most tender (swiss chard...it gets piled on top, then I simply set the cover on top). We gently soften everything...you can saute as much or as little as you like.

put your favorite pasta in a dish and layer these yummy veggies over the top. We also added a little well seasoned/herbed locally raised ground beef. yum!

Sunny 4th of July

Hello!
The weather has been wonderful to us recently. Our garden is growing rapidly. The pea pods, summer squash, broccoli, beets, ancho peppers, onions, swiss chard, rhubarb and herbs are just turning ripe.

However, the garden is still behind. We have TX family visit us each year before the 4th of July. While they are here, we usually enjoy an abundance of pea pods, beets, summer squash, currants, gooseberries, strawberries, and raspberries and can see cucumbers that are about to ripen any day. We did eat a few peas off the vine, but that was it for this year. But, they are coming along and will be here this week...and we know this is just the beginning of a glorious harvest season! Everything is growing really nicely now.

This last week, we planted late-season broccoli and cabbage under a bright blue sky.

Mom will post a recipe later.

That's all for now folks,
the RoseBros